Netgear is known for its vast product line. Right from networking switches to access points, Netgear has everything you need. Not only this, but users are also able to gain access to a high-speed internet connection by performing Netgear Nighthawk router setup or extender setup. Let’s not forget ReadyNAS systems that have made it feasible for netizens to store their data on an online portal so that the same can be accessed by numerous users in an organization. When on the one hand, performing WiFi router setup and accessing the device is an easy task, it has been observed that some users are facing problems accessing their Network Attached Storage device. This blog will use Netgear ReadyNAS 3138 as reference. You can use the information given here for all online storage systems.
Understanding the Concept: ReadyNAS3138 Not Accessible
If we are saying that the ReadyNAS is not accessible, it means that the device is not visible on your system. Later in this blog, we will discuss the solutions when you are facing issues accessing your ReadyNAS device because:
The host networking device (router) to which the ReadyNAS is connected has been changed by you
IP address conflict
It is also possible that your ReadyNAS device’s IP address is not matching the new IP subnet due to which it is appearing offline and hence you are facing issues accessing it. This usually tends to happen when the static IP of the ReadyNAS NIC is not matching the new LAN subnet. There is also a chance that you have set ReadyNAS to get IP address from DHCP.
Solutions: Netgear ReadyNAS 3138 Not Accessible
This is to inform you that if we mention the term “new network”, it means that we are talking about the new location or a networking device (router/gateway) due to which there is a change in IP subnet.
Use the Second NIC: Do your new network has a DHCP server running? Do your ReadyNAS 3138 have a second Network Interface Card (NIC)? If yes, then you should swap the Ethernet cable from the existing NIC to the second NIC. As a result, the second Network Interface Card will still use the default DHCP client settings. Also, it will help the NIC to get the correct IP address from the DHCP server. Just in case, the second NIC fails to help you out, you are suggested to move to the next tip.
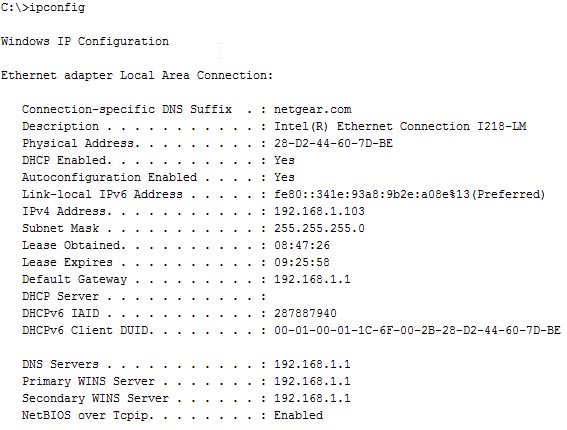
Note the Existing IP of ReadyNAS: You are suggested to take notes of the existing IP address on the LAN and use the IP address of your Netgear ReadyNAS 3138 to access it. You can find the IP range from your Windows PC that is currently connected to the LAN. For this, simply open Command prompt and type ipconfig into it. Pressing the Enter key will start generating results and you will be able to see the IP address of your NAS.
Create a Direct Connection: You have to now grab an Ethernet cable and run it directly from your NIC (Network Interface Card) of the PC to the Ethernet port of your Netgear ReadyNAS device. After that, you should use the RAIDar to know the IP address assigned to your device. However, you need to ensure that the Ethernet cable chosen by you is non-damaged and you’ve created finger-tight connections.
Change the PC’s IP Address: If you are still failing to access your Netgear ReadyNAS 3138, you have to change the IP address on your computer to match the IP subnet on which your Netgear ReadyNAS is currently running. For this, you need to open Network and Sharing Center and Change Adapter Settings. Thereafter, select your connected NIC and select Properties. Move to its Properties via Internet Protocol Version 4 (TCP/IPv4). Now, choose the option labeled Use the following IP address and enter the IP address from a particular range (169.254.0.0 – 169.254.255.255) and click OK two times.
Verdict
By following the hacks that we’ve just mentioned, you will be able to access your Netgear ReadyNAS 3138 easily. However, if after all the troubleshooting proves to be of no help, you should opt to re-install the OS just like the way you do with a router. The only difference is that you can install the router via the routerlogin.net URL whereas you will have to use the default IP address of your Netgear ReadyNAS storage device to set it up. But, before all that, make sure that you reset the administrator password and network settings of your NAS to their default values.