DHCP or Dynamic Host Configuration Protocol takes the position of one of the vital parts of your network, allowing the devices to be not only connected to the internet, but automatically configuring device IP addresses. When DSL is used, internal networks may be served by routers such as those from Netgear and Linksys, acting as the DHCP servers.
What this does is that is eases the processes of adding new devices to your network hence effectively manages IP addresses for conflicts preventions.
In case it is the time when you are setting your Netgear router for the first time or when you are getting your network connectivity back, DHCP might be the right thing to enable. This guide will walk you through the whole process step by step, i.e. enabling the DHCP on the router. Note that the example of Netgear router is not limited to only on this router, you can find this feature on the router which you are using.
Why Should You Enable DHCP on WiFi Router?
The number one advantage of turning DHCP on is the automation of network management as one does not need to keep track of each attached device. Without DHCP, you would have to set up an IP address for each one of the devices individually which it sounds like a boring and chaotic task.
How to Enable DHCP on Router?
1. Access the Netgear Router Admin Page
Begin by connecting your computer to the Netgear router through an Ethernet cable or via a Wi-Fi. The choice is yours. Yet, keep in mind that the Ethernet cable has to be undamaged.
Once done, launch any web browser on your computer. See to it that it is not updated to the latest version but also not accumulated with cache, cookies, and browsing history.
Type the router default IP address into the address bar of the browser. This is usually 192.168.1.1. If case, this does not work, you can use the routerlogin web address. Hit Enter to go to the next screen. Here you will be asked to give in a username and password.
2. Navigate to the DHCP Settings Next
Once you have logged in, you’ll see the Netgear router’s admin interface. Look for sections labeled as LAN Setup or Network Settings. The exact naming can vary depending on your router’s firmware version. In case you want to avoid getting lost while locating the options, refer to the information given in the user manual of your networking device.
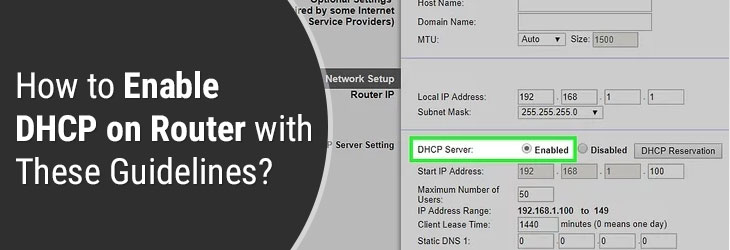
In the LAN Setup or Network Settings menu, find the DHCP settings. There should be an option to enable the DHCP server if it’s not already enabled.
This option might be a checkbox or a toggle switch labeled Enable DHCP Server or Use Router as DHCP Server. While enabling DHCP is often as simple as toggling it on, you might want to customize a few settings. To learn about what we are talking, go through the information given in the following section of this blog post.
What Settings Can You Customize?
IP Address
These settings define the range of IP addresses that the DHCP server can assign. Adjusting this range can be useful if you want to reserve certain IP addresses for static assignments.
Lease Time
This setting determines how long a device retains its DHCP-assigned IP address before it needs to request a new one. The default setting is typically suitable for most networks.
Reservations
If you have devices that you wish to always have the same IP address, you can reserve specific addresses within the DHCP range.
What Should You Do to Finish Process?
After enabling DHCP and adjusting settings as needed, look for a Save, Apply, or OK button to save your changes. Your router may reboot. To ensure DHCP is working correctly:
Reconnect Your Devices
Have your devices disconnect and then reconnect to the network. They should automatically receive IP addresses from the DHCP range you’ve configured.
Check Connectivity
Verify that devices can access the internet of the Netgear wireless router and communicate with each other within your network.
Can’t Enable DHCP on your Wireless Router?
If you encounter issues while enabling DHCP, then it is recommended that you consider the following troubleshooting tips. They might help you out.
- Restart your router and devices. Sometimes, simply restarting can resolve issues.
- Ensure no devices are set with static IP addresses that fall within the DHCP range.
- Access the Nighthawk router setup wizard and update the firmware.
In the Nutshell
Learning how to enable DHCP on router is a very simple process that helps to simplify network management and enhance the connectivity experience for all your devices. By following the steps outlined in this guide, you can ensure your network is efficiently managing IP addresses, allowing for hassle-free internet access. Remember, while DHCP does most of the heavy lifting, a basic understanding of your network’s needs and occasional tweaks can help maintain a smooth and stable connection.