The networking world is vast and so does the number of networking devices there. These days products brought in by Netgear are in talks. The reason is their top-notch WiFi performance. Therefore, if you still haven’t employed a Netgear Nighthawk device in the house, you are suggested to do the honors now. Investing in a Netgear extender will work wonders for you since it will combine with your existing gateway and extend its network range. In this blog, we will try to explain the process of adding a Netgear Nighthawk extender to the home network. We will take HughesNet gateway as the extender’s host. Can we start explaining how to connect Nighthawk extender to HughesNet gateway?
There are times when the user tries to connect an older Netgear Nighthawk extender to a HughesNet gateway and fails miserably. The main reason behind this occurrence is that the extender will still try to pick up the settings of the previous gateway. Thus, you make things possible; it is recommended that you reset your WiFi extender to the default factory mode. For this, locate the Reset button on your Netgear Nighthawk extender and press it using a sharp object. Your extender will reset and will become ready for the connection with the HughesNet extender.
How to Connect Nighthawk Extender to HughesNet?
The process of connecting the Nighthawk extender to the gateway will involve certain steps. Although it can be done via the Nighthawk app, we still recommend you use the login URL. Therefore, you are required to follow the steps very carefully. Here’s what you are supposed to do:
- Set Up the HughesNet Gateway First: Before all else, you should ensure that your HughesNet gateway is already installed. In case you haven’t done it yet, you should get it done. Simply, open a web browser on a computer connected to the gateway and access the default IP address. Log in to your HughesNet device using the default admin details and set it up.
- Connect Computer to Netgear_ext: The next thing you need to do is connect your computer to the WiFi network of your Netgear Nighthawk extender. Therefore, open WiFi Settings on your computer and look for the network name Netgear_ext. Connect to it using the WiFi password given on the Netgear Nighthawk extender’s label. You can also take reference from the product’s user manual.
- Visit Mywifiext.net: Once your computer gets connected to the WiFi network of the extender, you are suggested to access the login URL mywifiext.net on an updated web browser. There are chances that a login window shows up. Input the required values. Thereafter, choose the operating mode of the extender. Choose if you want the Genie’s assistance.
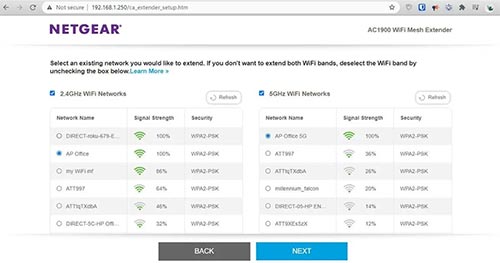
- Finalize the Connection: After choosing the extender’s operating mode, you need to select the network to be extended. In the current scenario, you are suggested to choose the HughesNet gateway. Also, enter the WiFi password and click Connect. You will have to assign the SSID and password to your extender. Save the changes and follow the on-screen instructions very carefully.
The moment you get to see the Internet Status as Connected, it is a sign that you have successfully paired the Netgear Nighthawk extender to the HughesNet gateway. On the off-chance, you have done Netgear Nighthawk router setup in the house; you can pair it with the Nighthawk extender using the same instructions. But, no matter which is the host device, you are suggested to relocate it after the connection process. The extender must be in the range of the HughesNet gateway. It you keep them far apart, both devices will not be able to communicate properly.
The Bottom Line
We are hopeful that you have learned how to connect Nighthawk extender to HughesNet gateway. Just in case you are failing to create a successful connection between your devices, it is advised that you check the LAN cable connecting your HughesNet gateway. It is supposed to be free of all kinds of damages. Plus, be very sure that you are running it through the correct ports of the devices. Once you confirm that, nothing can stop you from establishing a successful connection between your devices.
There are times when the user tries to connect an older Netgear Nighthawk extender to a HughesNet gateway and fails miserably. The main reason behind this occurrence is that the extender will still try to pick up the settings of the previous gateway. Thus, you make things possible; it is recommended that you reset your WiFi extender to the default factory mode. For this, locate the Reset button on your Netgear Nighthawk extender and press it using a sharp object. Your extender will reset and will become ready for the connection with the HughesNet extender.
How to Connect Nighthawk Extender to HughesNet?
The process of connecting the Nighthawk extender to the gateway will involve certain steps. Although it can be done via the Nighthawk app, we still recommend you use the login URL. Therefore, you are required to follow the steps very carefully. Here’s what you are supposed to do:
- Set Up the HughesNet Gateway First: Before all else, you should ensure that your HughesNet gateway is already installed. In case you haven’t done it yet, you should get it done. Simply, open a web browser on a computer connected to the gateway and access the default IP address. Log in to your HughesNet device using the default admin details and set it up.
- Connect Computer to Netgear_ext: The next thing you need to do is connect your computer to the WiFi network of your Netgear Nighthawk extender. Therefore, open WiFi Settings on your computer and look for the network name Netgear_ext. Connect to it using the WiFi password given on the Netgear Nighthawk extender’s label. You can also take reference from the product’s user manual.
- Visit Mywifiext.net: Once your computer gets connected to the WiFi network of the extender, you are suggested to access the login URL mywifiext.net on an updated web browser. There are chances that a login window shows up. Input the required values. Thereafter, choose the operating mode of the extender. Choose if you want the Genie’s assistance.
- Finalize the Connection: After choosing the extender’s operating mode, you need to select the network to be extended. In the current scenario, you are suggested to choose the HughesNet gateway. Also, enter the WiFi password and click Connect. You will have to assign the SSID and password to your extender. Save the changes and follow the on-screen instructions very carefully.
The moment you get to see the Internet Status as Connected, it is a sign that you have successfully paired the Netgear Nighthawk extender to the HughesNet gateway. On the off-chance, you have done Netgear Nighthawk router setup in the house; you can pair it with the Nighthawk extender using the same instructions. But, no matter which is the host device, you are suggested to relocate it after the connection process. The extender must be in the range of the HughesNet gateway. It you keep them far apart, both devices will not be able to communicate properly.
The Bottom Line
We are hopeful that you have learned how to connect Nighthawk extender to HughesNet gateway. Just in case you are failing to create a successful connection between your devices, it is advised that you check the LAN cable connecting your HughesNet gateway. It is supposed to be free of all kinds of damages. Plus, be very sure that you are running it through the correct ports of the devices. Once you confirm that, nothing can stop you from establishing a successful connection between your devices.